Friday, June 18, 2010

Crochet Tutorial - How to Crochet Around Both Sides of the Chain

Crochet Tutorial
How to Crochet Around Both Sides of the Chain

When you want to create more of an oval/oblong look than a circle you will need to crochet on both sides of the chain.
In order to do this you start with a basic chain. For this tutorial I used a chain of 11.
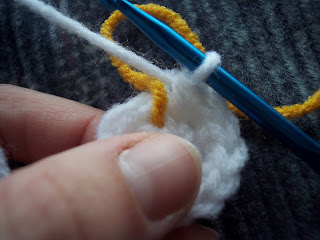
You then sc in the 2nd chain from the hook.
You follow the instructions, in this case, sc around with increase or 2sc in each end stitch.

In order to do this, sc in the 2nd chain from the hook, 8sc, 2sc in next (this is the end stitch), (11sc at this point), then you continue on the opposite side of the chain, another 8sc, and 1sc in the last (this is the original 2nd chain from the hook so there will be a total of 2sc in it). This brings your final round count to 20.

Your round includes both sides, all 20sc and you place your stitch marker at the end of the 20th sc and before your next.
You have now crocheted around both sides of the chain.


Hope this helps!

Any questions, feel free to ask:
mycrochetivity@yahoo.com

Check out my etsy shop!

HAPPY CROCHETING!

♥ KP ♥


Saturday, June 12, 2010

Crochet Tutorial - How to Make Hair

Crochet Tutorial
How to Make Hair

When making amigurumi there are many times when you need to make "hair" for your doll or creature. You can individually tie knots with each piece of hair, but I don't care for the large knots this creates. I prefer this "hair method."

You would traditionally make hair on the head, usually a ball, however for this tutorial I am just using a circle for an example.


First you insert your hook under the stitch you want to attach the hair.


Cut the pieces of hair in the desired length and fold in half, hook the yarn at the midpoint.


And pull through, just a loop, not all the way.


Once you have the loop, pull the remaining tails, through the inside of the loop.


Continue this as few or as many strands as you want for the desired look.

Hope this helps!

Any questions, feel free to ask:
mycrochetivity@yahoo.com

Check out my etsy shop!

HAPPY CROCHETING!

♥ KP ♥


Crochet Tutorial - How to Change Colors

Crochet Tutorial
How to Change Colors During a Project

There are many times when you need to change colors during a project. In order to do so, the first step actually begins during your first color. You begin your stitch, and work it until the very last step. DO NOT COMPLETE the last step in your first color.

For example, if you were doing a sc, the stitch is as follows:
insert in st, yarn over, pull up a loop, (2 loops on hook) yarn over, pull through.
BUT if you are changing colors you will not complete the last step.
Instead you would:
insert in st, yarn over, pull up a loop (2 loops on hook)....
STOP HERE
This is where you begin your new color.
You would yarn over and pull through with your new color.

This can be done with any stitch, just complete the last step with the new color.

For example, if you were doing a hdc the stitch is as follows:
yarn over, insert in st, yarn over, pull up a loop (3 loops on hook), yarn over and pull through.
BUT if you are changing colors you will not complete the last step.
Instead you would:
yarn over, insert in st, yarn over, bring up a loop (3 loops on hook).....
STOP HERE
This is where you begin your new color.
You would yarn over and pull through with the new color.

You now have your new color on your hook.
When changing colors make sure you leave a tail with both the old and new colors and secure them by crocheting OVER them or your work could come undone. I do approx 4-5 stitches over the tails and then cut off the remainder. Then continue crocheting in your new color. This may be repeated as many times as necessary.


Now you can make multi colored projects! Stripes are great


Hope this helps!

Any questions, feel free to ask:
mycrochetivity@yahoo.com

Check out my etsy shop!

HAPPY CROCHETING!

♥ KP ♥

Thursday, June 10, 2010

Crochet Tutorial - How to Make an Adjustable Ring

Crochet Tutorial
How to Make an Adjustable Ring

This is a basic tutorial for beginners who do not know how to make an adjustable ring. An adjustable ring is used when crocheting in round instead of the traditional chain 2, sc in the first chain. When using an adjustable ring you avoid the open hole found using the chain method. The adjustable ring is beneficial when making toys and hats or anytime you do not want a hole in your project.

Ring made by chain 2, sc in first chain.

Ring made using adjustable ring.

To demonstrate this tutorial I am using a very large hook (K). This is so that the stitches are large enough for you to see them. Using a hook this large will create a rather "gappy" round, I usually use a G hook or smaller.

To begin, create a loop with your yarn leaving the tail on top of the yarn still attached to the skein.

Holding tightly where both strands meet (at the x), then insert hook in loop, yarn over and pull up a loop.
Yarn over and pull up through loop. (Made a ch).
Make sure you are holding both the loop and tail together. (I reposition my hands here). Insert hook into loop, yarn over, pull up a loop (2 loops on hook.) Yarn over and pull through both loops.

Please note this stitch holds your loop together and DOES NOT count as your first sc.
Now you begin your sc into your loop, as many as stated. Be sure to sc over both the tail and the loop so that when you pull the tail the loop will close tight leaving no hole.
I have done 6sc into adjustable ring, this is what it looks like before pulling tight.

6sc into adjustable ring once pulled tight.

There appears to be a wedge in between the last and first sc, however, once you continue in round you will have a perfect circle with no hole.
This is not an easy method at first. It was hard for me to get my hand placement right, I kept losing the loop! But practice, practice, practice! You will get it! And it looks SO much better than a gaping hole.

Hope this helps!

Any questions, feel free to ask:
mycrochetivity@yahoo.com

Check out my etsy shop!

HAPPY CROCHETING!

♥ KP ♥

Crochet Tutorial - How to Use Scrap Yarn as a Stitch Marker

Crochet Tutorial
How to Use Scrap Yarn as a Stitch Marker

This is a very basic tutorial for those who have never used scrap yarn as a stitch marker. You need a stitch marker to keep track of where the beginning of each round starts when you are crocheting in rounds. You may purchase stitch markers; however, I find it easier and cheaper just to use scrap yarn. For this tutorial I am doing a basic sc circle, you can use this technique with any stitch you are crocheting in round.

After you come to the end of the first round you want to mark, you lay the scrap yarn in between the last sc of one round and the first sc of the next.


In this picture I have crocheted around of 6sc into adjustable ring and marking with gold scrap before continuing to my next round.


After laying the scrap yarn across, insert hook into next sc, leaving scrap yarn underneath.

Continue your sc by yarning over and pulling through (first picture). Then yarn over and pull through both loops (next picture). 1st sc of next round completed.

The scrap yarn or stitch marker is now marking where your first round ends and your second round begins. Continue your second round until you come to your stitch marker again (first picture). This time simply take your scrap yarn that is on the right side of your work and flip across to other side (next picture).

Continue sc and marking stitches with each round.

As you continue in rounds please note that your stitch marker line will begin to move depending on your increases and/or decreases. It will not stay totally straight. THIS IS NORMAL. Do not think you have done something wrong.

Here is an example after multiple rounds of increase.

Hope this helps!

Any questions, feel free to ask.
mycrochetivity@yahoo.com

Check out my etsy shop!

Happy Crocheting!
♥ KP ♥